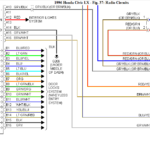
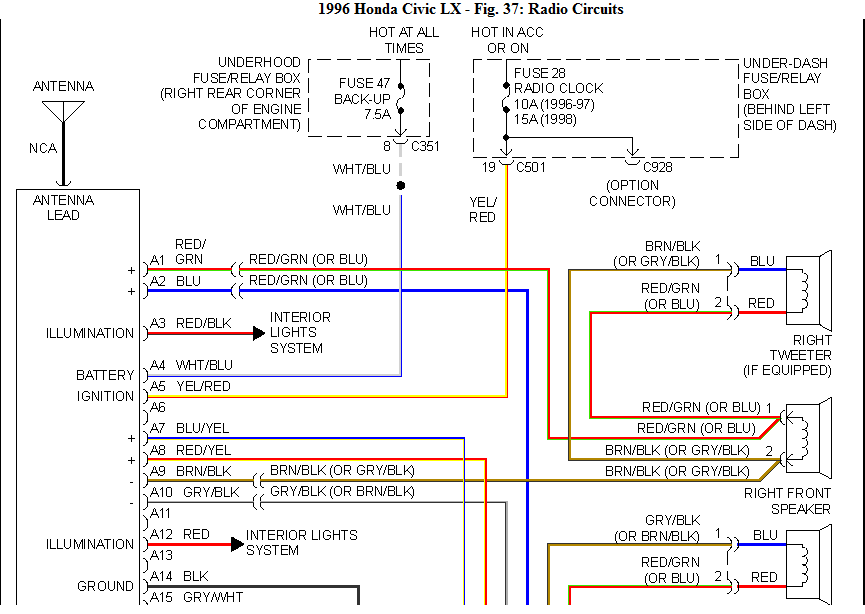
96 Honda Civic Hatchback Stereo Wiring Diagram – The Honda Stereo Wiring Diagrams can be used to check if your car’s audio system is working properly. This diagram shows which cords are connected to what element of your car or truck along with their function. A few cords are usually employed for power: the discolored for frequent 12V energy, red for add-ons and orange with white lines to illuminate. Each cable is allocated a certain colour to indicate its operate. The location of the loudspeaker wires decides how they are tinted. The shades suggested the position of the back end speakers.
Harnesses
Harnesses are employed to link up wire connections within a vehicle’s sound system. Various coloration regulations are used to distinguish between the numerous harnesses. The red cable symbolizes switched power along with the white colored cable the beneficial lead to the top remaining lecturer. You should read the instructions for wiring colors before installing an aftermarket stereo. You’ll be able to identify which wires choose which loudspeaker by looking at the installation handbook.
A electrical wiring diagram is helpful when the installation of a stereo process in Honda. The diagram is capable of showing you which cords see your car’s illumination, which towards the electric battery and which to the vehicle fm radio. The diagram also displays which cable hues go along with which radio station parts.
You should also take note of the amplifier. A lot of automobiles have separate amplifiers that connect in to the manufacturer speakers. In order to preserve it, you will need to ensure that the new amplifier is compatible with your car’s factory radio. An amp sidestep funnel enables you to take advantage of the amp’s power, without affecting the manufacturing facility amplifier. Although avoid harnesses may be cheaper than incorporated amplifiers, they are still more challenging to use.
Pigtails
A electrical wiring diagram is essential when cabling your car’s stereo. It will assist you to satisfy your go unit’s wire connections for the appropriate utilize. A wires diagram are available on the web for that go unit you are searching for. To make sure that the appropriate wire connections are connected, you will have to verify the hue code.
The installation of an upgraded stereo needs you know the best way to connect the cables and wires. There are actually 2 kinds of connections on the vehicle’s stereo system system: white and red. The switched potential is depicted by the reddish cable, even though the bright white guide is for the front appropriate lecturer. Ensure you have read the instructions and checked the color scheme on the adapter harness, before you start wiring.
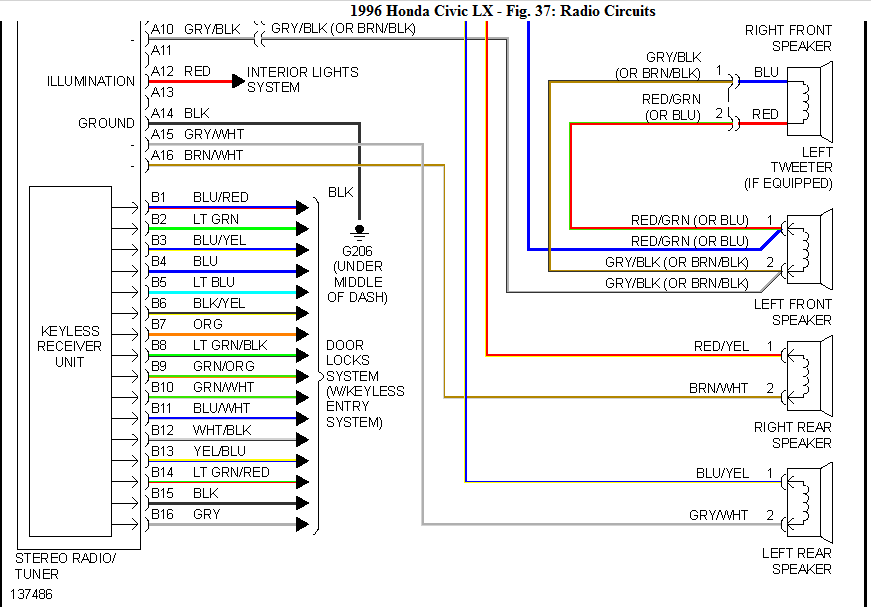
You can find several types cables that go into your car’s stereo system. A few of these wires are potential cables. They supply continuous 12V for the car’s stereo program. The orange and red wire connections are being used as components. The orange with bright white stripes enables you to provide light for. There are a number of wire connections which will connect to your audio speakers. The remaining entrance loudspeaker will be the bright white cable, and also the appropriate rear lecturer may be the green and purple cables.
Presenter wires
This diagram will allow you to hook up your Honda’s loudspeaker wires. You have to very first identify the cables within your automobile. Hondas ordinarily have several forms of wires: accessory, speaker and power. You can find various cable colours for each variety. Every wire is coloration-coded to indicate its function. For example, the white colored wire connections check out the still left lecturer as well as the crimson wire connections to the right presenter.
After you have determined the various cable sorts, it can be time for you to identify the ground cable. An ohmmeter may be used to accomplish this. To test continuity, connect the ohmmeter having a floor. If you don’t own an ohmmeter you can connect one speaker wire with an AA battery, to check continuity.
An upgraded wire harness is yet another option. This makes it easier to install and remove any uncertainty regarding wire colors. Even though the factory wire colour rules may not be common, aftermarket wire harnesses can be. They will also give you all the information you need in order to locate power wires and troubleshoot issues.
Amp get around harnesses
An amp bypass harness is a good option if you are planning to install a car stereo system. This adaptor links your brand new stereo’s outputs towards the production line amplifier’s inputs. You may then use the manufacturer amp’s potential for driving your loudspeakers. These adapters will also be less than amp incorporation adapters. If the factory amp is in an unusual place, they may need more work.
A lot of autos include built-in amplifiers. These require a 12v signal in order to turn on. The AMP TURNON transmission will be the wire that joins the top device and also the amplifier. The AMP TURNON sign, which happens to be found on the wire harness from the go device, is the light blue/bright white wire.
If you are looking to install an aftermarket stereo system, an amplifier bypass harness is essential. These extras allow you get around the supply increase and amplifier the wire duration. They are more expensive than regular stereos, but they can be programmed to add special features to your car. Before you buy it, make sure the amp bypass harness fits your car. Online resources may help you choose the right 1.
Gallery of 96 Honda Civic Hatchback Stereo Wiring Diagram