1990 Honda Crx Stereo Wiring Diagram – If your car’s audio system is working properly, the Honda Stereo Wiring Diagrams can be used to check. This diagram will show which wires are connected to what element of your car or truck in addition to their function. 3 wire connections are generally useful for potential: the yellowish for constant 12V potential, red for components and orange with white-colored stripes to provide light for. Every single wire is allocated a certain shade to indicate its function. The position of the presenter cords can determine how they are tinted. The shades mentioned the position of the back audio speakers.
Harnesses
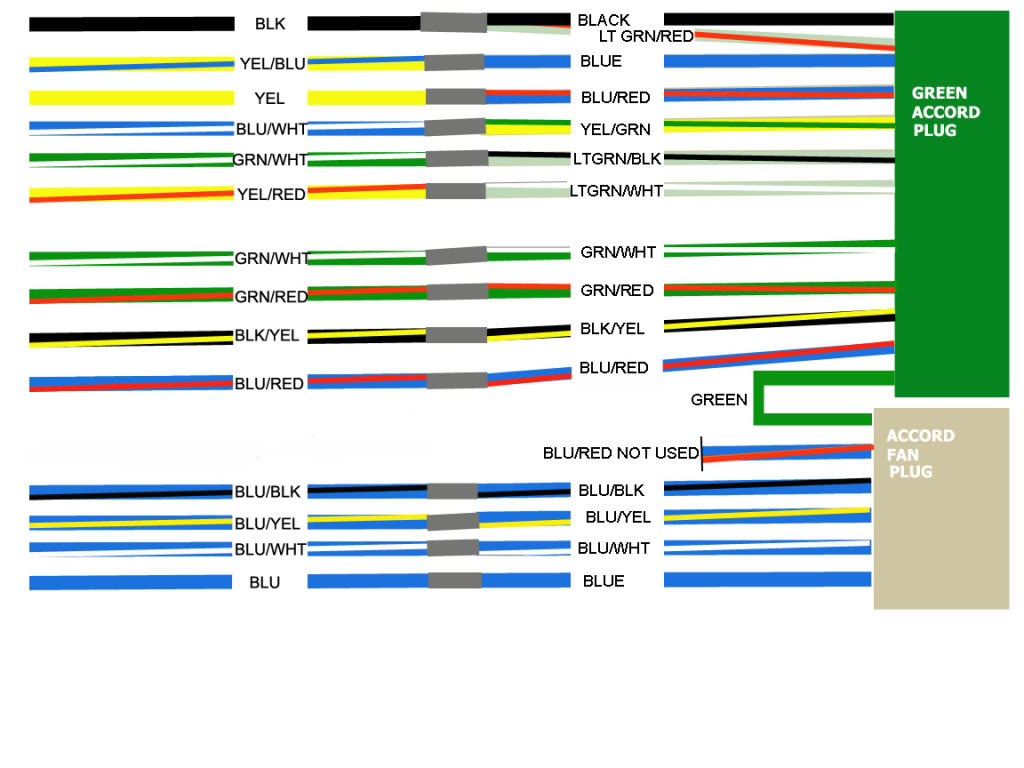
Harnesses are employed to link up wire connections within a vehicle’s speakers. Distinct coloration requirements are employed to distinguish between the many harnesses. The reddish wire represents changed energy and the white colored wire the good cause the top still left lecturer. You should read the instructions for wiring colors before installing an aftermarket stereo. You’ll have the ability to recognize which wire connections go along with which presenter by reading through the installation guidebook.
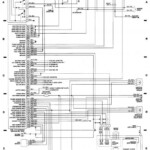
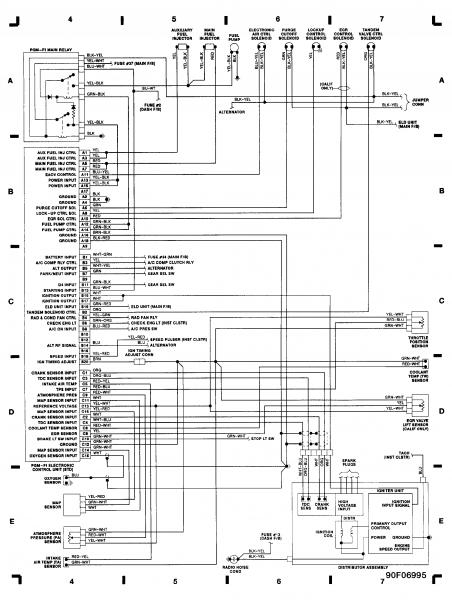
A wiring diagram helps when putting in a stereo process in Honda. The diagram is capable of showing you which wires go to your car’s illumination, which to the battery and which for the car radio. The diagram also reveals which cable shades choose which stereo parts.
You need to take notice of the amplifier. A lot of vehicles have independent amplifiers that plug in to the production line speaker systems. You will need to ensure that the new amplifier is compatible with your car’s factory radio in order to preserve it. An amp avoid harness permits you to take advantage of the amp’s energy, without influencing the production line amplifier. Though sidestep harnesses can be more cost-effective than built-in amplifiers, these are continue to tougher to work with.
Pigtails
A electrical wiring diagram is essential when wires your car’s stereo. It will assist you to suit your head unit’s cords to the right harness. A electrical wiring diagram can be obtained on the web for your head model you are interested in. To make certain that the correct cords are being attached, you have got to authenticate the colour program code.
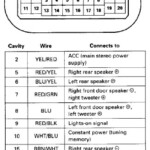
The installation of an upgraded fm radio calls for you are aware the way to hook up the wires and cables. You can find 2 kinds of connectors on the vehicle’s stereo system: white and red. The switched strength is displayed through the red-colored wire, even though the white-colored steer is designed for the front side proper loudspeaker. Ensure you have read the instructions and checked the color scheme on the adapter harness, before you start wiring.
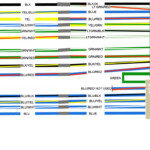
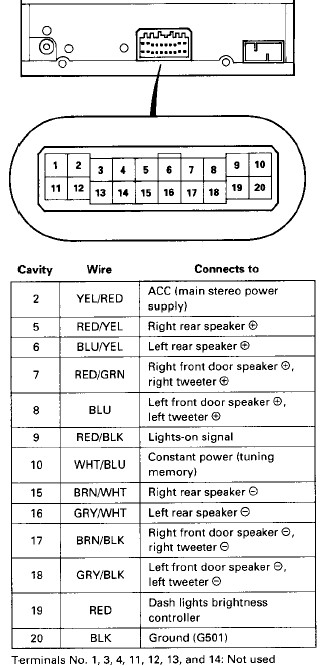
There are actually a number of types cords which are in your car’s stereo system. A few of those cables are strength cables. They provide continual 12V for the car’s stereo system system. The red and orange wires are utilized as components. The orange with white-colored stripes can be used to light up. In addition there are four cords that may get connected to your loudspeakers. The kept front presenter will be the white colored cable, as well as the right rear speaker may be the purple and green cords.
Presenter wires
This diagram will allow you to link up your Honda’s loudspeaker wires. You should initial recognize the wire connections in your vehicle. Hondas usually have 4 varieties of wires: speaker, accessory and power. There are actually different cable colours for every single kind. Each and every cable is shade-coded to indicate its goal. By way of example, the white colored cables proceed to the still left speaker as well as the crimson cords to the correct speaker.
After you have recognized the numerous cable varieties, it is a chance to identify the soil wire. An ohmmeter may be used to try this. To test continuity, hook up the ohmmeter with a soil. If you don’t own an ohmmeter you can connect one speaker wire with an AA battery, to check continuity.
An upgraded wire utilize can be another alternative. This will make it much easier to install and remove any guess work concerning wire colours. Although the factory wire coloration requirements might not be common, upgraded wire harnesses might be. In order to locate power wires and troubleshoot issues, they will also give you all the information you need.
Amp get around harnesses
If you are planning to install a car stereo system, an amp bypass harness is a good option. This adapter connects your brand-new stereo’s outputs for the factory amplifier’s inputs. Then you can take advantage of the manufacturer amp’s power for powering your speaker systems. These adapters are also less expensive than amp integration adapters. If the factory amp is in an unusual place, they may need more work.
Numerous automobiles feature built-in amplifiers. These require a 12v signal in order to turn on. The AMP TURNON sign will be the wire that joins the top unit along with the amplifier. The AMP TURNON transmission, which is found on the cable utilize of the go device, may be the light blue/bright white cable.
An amplifier bypass harness is essential if you are looking to install an aftermarket stereo system. These components allow you sidestep the stock increase and amplifier the wire size. They are more expensive than regular stereos, but they can be programmed to add special features to your car. Make sure the amp bypass harness fits your car before you buy it. Online resources can assist you find the appropriate one.
Gallery of 1990 Honda Crx Stereo Wiring Diagram